
Long post ahead! Alert!
I love dessert. Basically anything sweet, I will probably eat no matter how full I am from my previous meal. Even more so, I love baking. Something about the combination of precision and chemistry with the creativity and artistic requirements really hits my happy place. So, as a fourth year medical student (read: with all the time in the world for real), I decided to pursue probably one of the most challenging baking ventures out there: the French macaron.
Some clarification is warranted. The most common thing I'm asked when I mention that I will be making macarons to share with others is whether or not they contain coconut. It took me awhile to understand the difference myself, but as it turns out there are such things as macaroons and macarons. This post is meant to explain how to make the delicate macarons, which are those cute cookie sandwiches you see photographed a lot because honestly, they are just very photogenic. Macaroons (with two o's) are those tasty desserts with shredded coconut, condensed milk, and chocolate (see here for a very lovely and graphic distinction between the two).
I first encountered a macaron at Blue Dog Bakery in Louisville, who by the way arguably has the best macarons in town in my humble opinion. I'd seen these delicate cookies often on Instagram, but sadly had to pass them up as I used to think I was allergic to almonds. Alas, I am not - thus a love story was born. I was obsessed. As many of you know, coming by these tiny treats does not come cheaply. I think they sell for maybe $2 each for about a 2.5 inch cookie sandwich. Yikes. My go-to move when I like something: I figure out how to make it. So, after several tries (and blogs and YouTube videos), I have finally conquered it. Mostly. I still have some mishaps here and there, but for the most part I can confidently say I have figured out a reliable method to making these desirables. Long post ahead, so stick with me. I wouldn't say this recipe is for the faint of heart, but it's certainly not impossible.

Equipment:
The special equipment honestly might be the biggest limiting factor here. I would argue that you need to have a scale, a standing mixer, and piping bags. I've seen a few recipes here and there that measure the ingredients in the traditional sense, but macarons are so finicky that I really do think a few grams difference can change a lot. Scales run about $15-20 depending on the brand, but you really don't need anything fancy.
 Honestly, I love recipes with weighed ingredients now because it's so much faster to just dump your flour into a bowl and achieve a weight rather than scooping and leveling. The standing mixer is negotiable. I had an electric hand mixer until we got married because who has $400 of their own to blow on a KitchenAid? As a side note, when/if you do choose to get married (and are remotely into baking and/or eating sweets), I highly recommend registering for one. To me, the consistency of the machine will do you better when beating your egg whites to their fluffy consistency. That being said - it's totally worth attempting with a hand mixer. The whole reason I worked so hard to learn how to make these little guys was to make something that seemed so fancy and inaccessible more within reach. Plus, it's a fun challenge for those who like to bake. Definitely give things a try with an electric hand mixer and let me know how it goes! Finally piping bags. You do not at all need to buy fancy piping bags or piping tips. I use a gallon sized Ziploc bag and cut the corner off of it. I do use piping tips, but you could get away without for this. You're just making circle dollops, not a fancy design.

 |
| When we got this, Parker told me I would never use it. I didn't for the first 2 years. Now it's a staple item. |
Ingredients:
The foundations of a macaron are very simple: egg whites, sugar, and almond flour. First, the egg situation. Important tip #1: your eggs must be room temperature. I try to pull them out of the fridge well before I get started so they can warm on their own. A faster route, as you see above, is to put them in a bowl of some sort with warm water to quickly bring their temperature up. Additionally, several blogs I read emphasize the benefits of "aging" your egg whites. This means you would separate your egg whites and leave them uncovered in the fridge overnight or even for a few days. I will say the times I've accidentally aged my egg whites (due to my getting distracted by other life needs) my macs have come out near perfectly so there may be something to this.
 Separating your egg whites might be the hardest actual skill involved. I still mess up often whether it be a stray shell piece in my whites or cracking the yolk. Thankfully, eggs are cheap, and I can dump and try again. I recently saw a post that suggested cracking your eggs into the bowl whole and then fishing out the egg yolks by hand (yes with your actual hand) because it's more gentle than the risk of puncturing a yolk with the edge of a cracked shell. If you like to get a little messy that may be the route for you. One of my underlying goals while baking is to be as efficient as possible - which leads to a lot of subconscious thought about minimizing dirty dishes. I like to crack my eggs right into my KitchenAid mixing bowl on my scale. That way I can just let them hang out in there while I'm prepping everything else to "age" and so I don't have to transfer them later (I have an irrational fear that I'm losing too much egg white stuck to the other bowl when I do transfer). My egg whites are always my first step. Set these aside. Next to measure all my dry ingredients. Again, I love just dumping these things into my bowls on my scales. I dump the appropriate amounts of almond flour and powdered sugar into the same bowl. You can either zero out your scale in between the two, or just do some quick math in your head. I always zero to be sure. I also go ahead and measure out my "caster sugar" (I think this is the British way of saying granulated sugar, or as I like to call it: regular white sugar). You won't need much of this so you can just dirty a tiny bowl for this use. Set that aside as well.


Some recipes tell you to put your almond flour and powdered sugar in the food processor. I've tried this. Not impressed. I don't actually feel like it makes a significant enough difference to warrant washing all those parts to my food processor (again, efficiency). Instead, I like the method I've seen of sifting the two dry ingredients. You don't need a true sifter with one of those squeeze handles. I just use a sieve or a strainer with a spoon. I considered listing this in the special equipment section, but I really think if you use store-bought almond flour you could maybe get away with just whisking the dry ingredients together to break up any big chunks. If your macs turn out lumpy you can blame me here. If you do have a strainer to sift with, push through as much as you can, twice, and I dump out the extra pieces that are too big. You can see about where I stop in the picture here. A note on the almond flour and where to buy it. I started out buying almond flour at Kroger. They sold Bob's Red Mill brand as the only option. It was horribly expensive, though, running me about $8 for 16 oz. Sam's Club miraculously sells 3 lb. for only $12 with a convenient resealable bag that works great. I'm sure other brands would work fine if you could find them. Some blogs even suggest being so bold as to make your own (by food processing blanched almonds). I'm not that ambitious, not even to save money.

After you've finished sifting, set your dry ingredients and side and buckle up for learning about beating egg whites. So when you beat egg whites enough (similar to whipping cream), magic happens in the form of what I assume to be protein denaturation and air introduction that converts gloopy clear whites into fluffy clouds of meringue. Also, there are levels to this: soft, firm, and stiff peaks.


Finally ramp that mixer up to the highest speed. Of course taking care to stop it every so often so you don't make the same mistake I did and overbeat the egg whites. I constantly stop and lift the mixer up to see what kind of peak situation I've got going on (checking whether they can stand up straight on their own or not). Allegedly if you over beat you can theoretically save your mixture by adding another egg white and hand stirring it in. I did not try this because I am super paranoid about exact measurements, but I've seen this done fine on YouTube. My advice: err on every so slightly under beaten eggs rather than over beaten eggs. If the very tip of that egg white peak doesn't quite stand up perfectly tall you're still probably just fine.

And now, dry ingredients meet egg whites. I think the fancy name for this part is called the "macaronage", but frankly it's just a delicate stirring technique. The objective is to combine the ingredients without smushing out too much of that delicate air you just beat into your egg whites, but also you need to smush some of the air out. I know. Confusing. I think this is something that I achieved only with practice and repetition.
 
Transfer your batter to a piping bag. A little trick I like to use to get the goods actually into the bag involves a blender (or a pitcher would work). Place the bag in the blender as pictured, and then you have two free hands to scoop your batter into your bag. I also like to fit the bottom of my bag with the piping tip with a clean bobby pin just so it doesn't leak out the bottom and give me more dishes to clean.
 
For the actual piping, you may or may not need to practice a bit. Life is made easier by the internet again with free downloadable templates that you can print out. I like to print two copies out and put them under my Silpat. Again, I decided against mentioning this in the special equipment because I've found that parchment paper works just as well. Some days I would argue parchment paper is better because at least one of my Silpats is super dirty from other baking adventures and it gives my macarons slightly more of a tan (insert sunglasses emoji). Most blogs say definitely do not use aluminum foil or directly pipe onto your pan. You will have a hell of a time trying to unstick them. Parchment paper is cheap and easy to clean by just throwing it away after use. Don't forget to remove your templates from under your Silpat/parchment paper before baking.
  
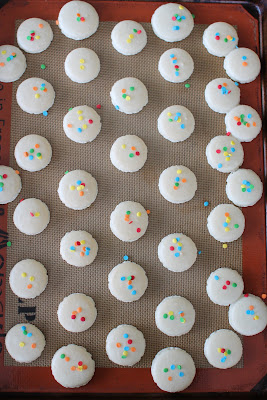
While they are drying you can add some extra little decoration. I recommend anything sort of dry and crumbly (i.e. sprinkles, coffee grounds, nuts). Anything with moisture can add too much moisture to the batter itself and again cause that cracking in the tops. For this batch I added sprinkles for a Funfetti look and feel as these were for my friend's birthday celebration. After baking, let these puppies cool completely before taking them off the pan. They should come off easily and have a complete base. If they stick too much and seem really sticky, they're likely undercooked. Depending on the size you pipe them out, you may need to bake them longer than I recommend in the recipe below.
I filled these with a homemade funfetti icing. You obviously could use store-bought, but why not go big or go home with the homemade stuff, right? Plus in my mind I'd much rather throw together ingredients I probably have laying around the kitchen (sugar, butter, and milk) than going to the grocery for stuff. I've included the frosting recipe below as well. Simply mix in some sprinkles with it after you've combined. The recipe can also be doubled for use for actual cupcakes or cakes. I credit this recipe to Sally's Bake Blog, which is where I get most of my recipes that I tweak (usually cutting back on the sugar).
Finally: ta-dah! You did it. I knew you could. You achieved the unachievable French macaron. Pipe or spread that icing in between those little bad boys and enjoy how pretty they look and how tasty they are. If you're still uncertain I found these YouTube videos superbly helpful: here and here.
 |
French Macaron Recipe
Ingredients/Tools:
- Food scale
- Electric mixer (standing or handheld)
- Strainer/sifter
- Parchment paper
- Piping bag (gallon sized Ziploc bag will work just fine)
For the cookies:
- 100g almound flour/meal
- 200g powdered sugar
- 40g granulated sugar
- 120g room temperature egg whites (preferably aged)
- 1/8 tsp salt
- 1/2 tsp of extract of your choice (I use vanilla, almond, or lemon most often)
- 2-3 drops of food coloring (gel preferred)
For the filling:
- 1 stick of unsalted butter, softened to room temperature
- 2-3 cups of powdered sugar
- 1/8 cup heavy cream
- 1 teaspoon of vanilla extract
- salt, to taste
- Funfetti sprinkles
Directions:
- Gather all your ingredients so they are easily accessible. Measure out your 120g of egg whites into your mixing bowl and set aside. You will not need the yolks in this recipe, throw these away or save for something else. Weigh out the rest of your ingredients (almond flour, powdered sugar, and white sugar). You can weigh the almond flour and powdered sugar in the same bowl.
- Sift your almond flour and powdered sugar mixture at least twice making sure there are no large clumps left in your mixture. Discard any pieces that are too large. Set aside.
- Add 1/8 tsp (or a pinch) of salt to your egg whites and begin mixing on low with whisk attachment.
- Once egg whites are frothy, slowly add granulated sugar while mixer is on. Increase your speed to medium once all the sugar has been added checking every few seconds to monitor consistency of your egg whites. When you get to a soft peak stage this is a good time to add any food coloring or flavoring to your eggs. Increase the speed to high and beat until you get stiff peaks.
- Remove bowl from mixer. Using a rubber spatula, combine almond flour/powdered sugar mixture with egg whites using gentle cut and fold stirring. Do this until mixture has hit "ribbon stage" or can achieve the "figure of 8" test. Careful not to overmix the batter. Batter should be thick* and somewhat sticky but still able to flow off your spatula when you lift it out of the bowl.
- Transfer to piping bag and pipe circles onto parchment or Silpat lined baking sheets according to a template if you wish.
- Allow piped macarons to dry for anywhere from 20-45 min or until skins have formed (you are able to touch them without leaving any stick residue on your finger). The timing here depends on how humid your climate is, honestly.
- Preheat oven to 325 degrees. Bake for 7-8 min, depending on strength of your oven, then rotate pan 180 degrees for even baking. Bake for another 7-8 min.
- Cool completely before removing from pan. Macaron shells should easily pop off your pan without leaving residue behind. They should have a nice smooth bottom. I don't get this every single time but usually. If they leave a sticky mess behind you might want to try baking them slightly longer next time.
*Of late, I've been mixing my batter slightly more than I used to. By more I mean a nice consistent flow of batter off your spatula but still thick enough to hold that figure of 8 shape in the bowl. I have complained profusely about the mess I make as the batter kind of runs out of my piping bag quickly, but it's honestly given me solidly consistent macarons over the last week.
For vanilla frosting:
- Place stick of room temp butter into mixer and beat on medium until creamy, about 2 min.
- Decrease speed to low. Slowly add enough powdered sugar (I always estimate here) to reach the consistency that you prefer for frosting. More powdered sugar means a stiffer, drier icing. Less leaves your icing more runny.
- While mixer is still running, add heavy cream, vanilla, and pinch of salt to taste.
- Add desired amount of sprinkles.
- Once your macs are cooled, spread or pipe the frosting onto one cookie and then sandwich with a second cookie.


